
Using Extensions
Install, update, pin, trust, and troubleshoot coc.nvim extensions, including registry choices, plugin-manager installs, and schema-aware configuration.
coc.nvim project documentation · Content sources and maintainers
Edit this pageWhy are coc extensions needed?
Extensions make language tools easier to use. Some community-provided language servers are harder to configure and use than VS Code extensions. Coc extensions can be forked from VS Code extensions to provide a similar or better user experience.
Extensions support more features than language servers configured directly:
-
Extensions can contribute properties to the
coc-settings.jsonschema. Withcoc-jsoninstalled, you get completion and validation support, as in VS Code.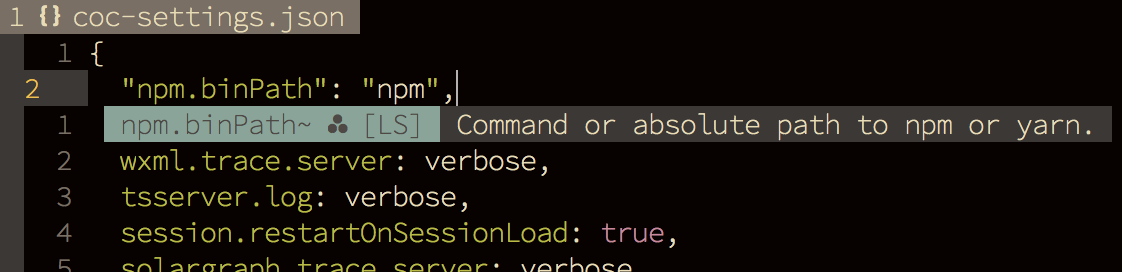
-
Extensions can contribute commands, as in VS Code. You can run these commands in several ways:
-
Run
:CocList commandsto open the command list and choose a command.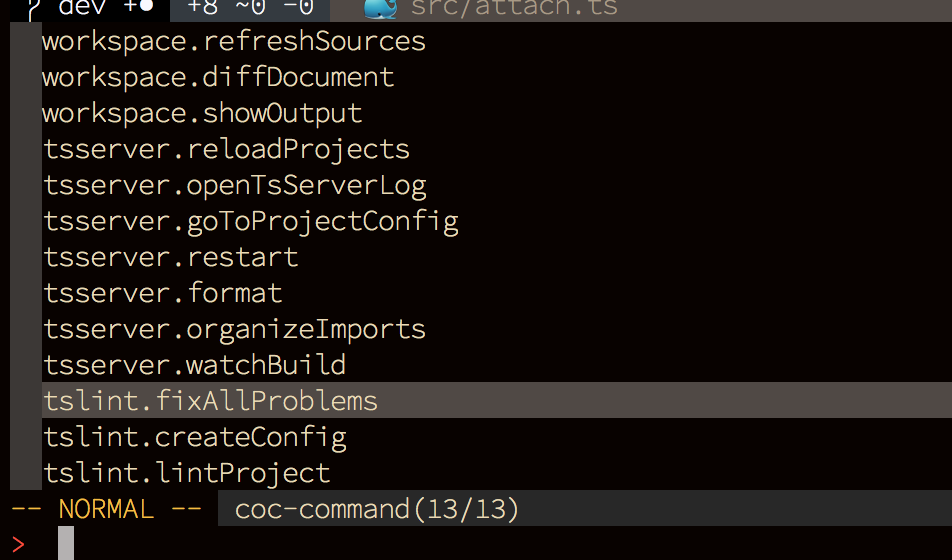
-
Use
:CocCommandwith<tab>for command-line completion. -
Define a custom command. This example maps
Tsctotsserver.watchBuild:vim snippet1 command! -nargs=0 Tsc :CocCommand tsserver.watchBuild
-
-
Extensions can contribute JSON schemas (loaded by coc-json).
-
Extensions can contribute snippets loaded by the coc-snippets extension.
-
Extensions can specify additional client options, such as
fileEventsfor watching files (uses the bundled native watcher by default, with Watchman as an optional fallback) andmiddleware, which can be used to fix results returned from the language server.
For more about the purpose and implementation of coc extensions, see How to write a coc.nvim extension.
Differences between coc extensions and VS Code extensions
- Coc extensions use coc.nvim as a dependency instead of VS Code.
- Coc extensions provide language server features through the coc.nvim API instead of vscode-languageclient, which can only be used with VS Code.
- Coc extensions support some features of VS Code extensions:
activateanddeactivateAPIs.activationEventsin package.json.- Configuration support:
contributes.configurationin package.json. - Command support:
contributes.commands. - JSON validation support via JSON Schema:
contributes.jsonValidation. - Snippet support.
Extension trust and safety
coc.nvim extensions are Node.js code that can use Node.js and coc.nvim APIs. Install only packages and source repositories that you trust. Before installing or updating an extension, inspect its npm package or source repository and the version you plan to run.
To isolate startup or extension problems, set COC_NO_PLUGINS to 1 in your vimrc to disable extension loading:
| 1 | let $COC_NO_PLUGINS = '1' |
Manage coc extensions
Single-file extensions
coc.nvim tries to load JavaScript files from the coc-extensions folder under g:coc_config_home (default ~/.config/nvim). Each JavaScript file should be a coc.nvim extension.
An example coc extension that converts the character at the cursor position to its Unicode code point:
| 1 | const { commands, workspace } = require('coc.nvim') |
| 2 | |
| 3 | exports.activate = context => { |
| 4 | let { nvim } = workspace |
| 5 | context.subscriptions.push(commands.registerCommand('code.convertCodePoint', async () => { |
| 6 | let [pos, line] = await nvim.eval('[coc#util#cursor(), getline(".")]') |
| 7 | let curr = pos[1] == 0 ? '' : line.slice(pos[1], pos[1] + 1) |
| 8 | let code = curr.codePointAt(0) |
| 9 | let str = code.toString(16) |
| 10 | str = str.length == 4 ? str : '0'.repeat(4 - str.length) + str |
| 11 | let result = `${line.slice(0, pos[1])}${'\\u' + str}${line.slice(pos[1] + 1)}` |
| 12 | await nvim.call('setline', ['.', result]) |
| 13 | })) |
| 14 | } |
Note: You cannot manage single-file extensions through the extensions list. To contribute extension metadata, create a ${name}.json file alongside ${name}.js with activationEvents and contributes properties.
Install extensions
Using :CocInstall:
| 1 | :CocInstall coc-json coc-css |
You can provide one or more extension names.
Note: coc.nvim does not currently support VS Code extensions.
coc.nvim loads and activates extensions after installation succeeds.
Note: Add extension names to g:coc_global_extensions to install missing extensions automatically after the coc.nvim service starts.
For example:
| 1 | let g:coc_global_extensions = ['coc-json', 'coc-git'] |
To install extensions with a shell script, use a command like:
| 1 | # install coc-json & coc-html and exit |
| 2 | vim -c 'CocInstall -sync coc-json coc-html|q' |
Using custom registry
You can customize the npm registry for coc.nvim by adding coc.nvim:registry to ~/.npmrc:
| 1 | coc.nvim:registry=https://registry.npmjs.org/ |
Installing specific versions (for rollback/revert/etc)
To install or roll back to a specific extension version, add @version to your install command.
For example, to install version 1.1.17 of coc-prettier, run:
| 1 | :CocInstall coc-prettier@1.1.17 |
Use vim's plugin manager for coc extensions
You can manage coc extensions with a Vim plugin manager like vim-plug. coc.nvim tries to load extensions from your &rtp.
Example for coc-tsserver:
| 1 | Plug 'neoclide/coc-tsserver', {'do': 'yarn install --frozen-lockfile'} |
After adding this to your vimrc, run PlugInstall.
Note: You must build TypeScript extensions when installing them from Git. Most of the time you should install yarn and run yarn install --frozen-lockfile in the extension root.
You cannot uninstall these extensions with :CocUninstall, and they do not support automatic updates.
Update extensions
Use the command :CocUpdate or :CocUpdateSync to update extensions installed by :CocInstall to the latest version.
Update extensions loaded from Vim's rtp with your plugin manager.
To enable automatic updates, set the extensions.updateCheck configuration to "daily" or "weekly" (defaults to "never").
To upgrade extensions with a shell script, use a command like:
| 1 | vim -c 'CocUpdateSync|q' |
Uninstall coc extension
Use the :CocUninstall Vim command for extensions installed by :CocInstall, for example:
| 1 | :CocUninstall coc-css |
Manage extensions with CocList
Run :CocList extensions to open the CocList buffer, which looks like:
| 1 | :CocList extensions |
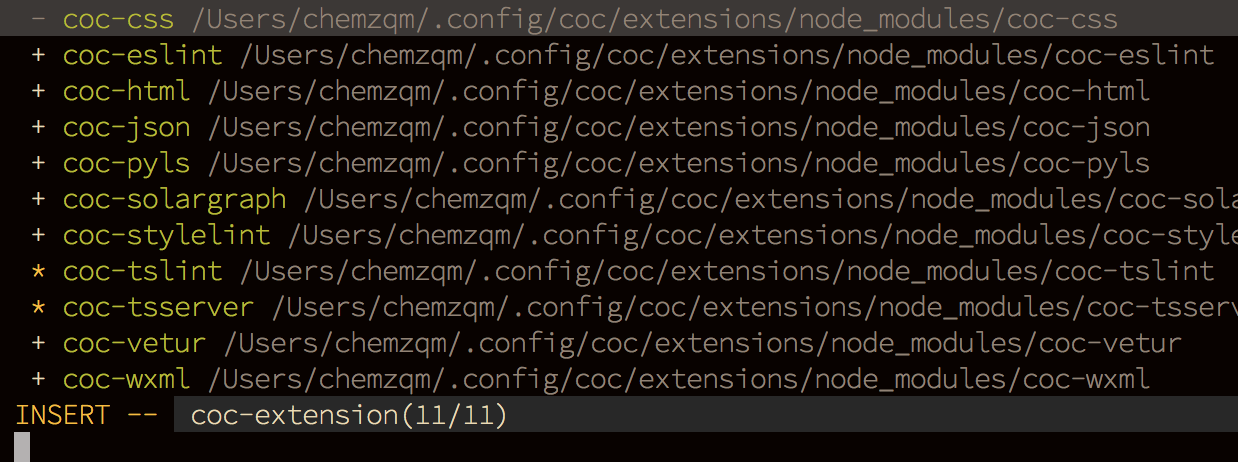
?means the extension isn't recognized by coc.nvim*means the extension is activated+means the extension's package.json is loaded, but the extension isn't activated-means the extension is disabled
Supported actions (press <Tab> to open the action menu):
toggle(default action): activates/deactivates the selected extension(s).enable: enables the selected extension(s).disable: disables the selected extension(s).reload: reloads the selected extension(s).uninstall: removes the selected extension(s).lock: toggles the extension's lock state; locked extensions won't be updated by:CocUpdate.
Debug coc extension
If an extension throws an uncaught error, use :messages to see the error message.
For extensions that use a language server, inspect its output channel. See </docs/debug-language-server#using-output-channel>.
Use console to log messages to coc.nvim's log file; supported methods include debug, log, error, info, and warn. See :h :CocOpenLog.
You can also use Chrome to debug extensions; see </docs/debug-coc-nvim>.
Finding Extensions
Looking for extensions for your programming languages, linters, formatters, or tools? Start with the Extensions directory on this site. It is the recommended place to browse the current catalog, filter by language or category, review package metadata, and copy install commands. For extensions not listed there, search the coc.nvim packages tagged on npm for a broader community catalog.
You can also discover and manage extensions directly inside Vim:
- Use
:CocList marketplacewith coc-marketplace to search, install, and update extensions interactively. - Search packages tagged
keywords:coc.nvimon npm.
Tip: Install
coc-jsonto get schema-based completion and validation incoc-settings.json, then use:CocConfigto open the file. Other extensions can contribute settings schemas, but they do not provide the JSON editing support themselves.