
Installation Guide
Manually install coc.nvim, verify Node.js and editor requirements, choose a runtimepath strategy, and troubleshoot advanced installation scenarios.
Quick Script InstallRecommended
Uses the selected editor's native pack mechanism. Run again anytime to update.
Review what it runs before executing: view installer source.
curl -fsSL https://cocnvim.com/install-coc.sh | bash -s -- --editor=nvim
The script checks Node.js and Neovim, detects another coc.nvim installation, then shows every planned path before confirmation. It installs to ${XDG_DATA_HOME:-~/.local/share}/nvim/site/pack/coc/opt/coc.nvim and the Neovim init file and preserves an existing native-pack copy as .backup-*. It adds one idempotent packadd coc.nvim entry when the config does not already load coc.nvim. Use --no-config / -NoConfig to leave config unchanged.
coc.nvim is mostly written in TypeScript and runs on Node.js.
Requirements
neovim>=0.8.0orvim>=9.0.0438(run:versionorvim --versionto find your Vim version)node>=22.15.0
Install Node.js.
Note: coc.nvim finds node by calling executable('node') from within vim. Check out
:h g:coc_node_path to customize the node path.
Note: NixOS users must follow these steps:
- Install Node.js via
nix-envor put it in/etc/nixos/configuration.nix sudo nixos-rebuild switch
Add coc.nvim to vim's runtimepath
Using vim-plug
Use coc's release branch (recommended):
| 1 | Plug 'neoclide/coc.nvim', {'branch': 'release'} |
Build from source:
| 1 | Plug 'neoclide/coc.nvim', { 'branch': 'master', 'do': 'npm ci' } |
Run the :PlugInstall command in your (neo)vim.
Using lazy.nvim
Use the default release branch (recommended):
| 1 | { 'neoclide/coc.nvim', branch = 'release', } |
Using packer.nvim
Use the default release branch (recommended):
| 1 | use {'neoclide/coc.nvim', branch = 'release'} |
Build from source:
| 1 | use {'neoclide/coc.nvim', branch = 'master', run = 'npm ci'} |
Run the :PackerInstall command in your (neo)vim.
Using dein.vim
Use release branch (recommended):
| 1 | call dein#add('neoclide/coc.nvim', { 'merged': 0, 'rev': 'release' }) |
Build from source:
| 1 | call dein#add('neoclide/coc.nvim', { 'merged': 0, 'rev': 'master', 'build': 'npm ci' }) |
Note: Without 'merged': 0, coc.nvim will not start.
Note: Depending on your network and CPU, the first build might take a while.
If you have trouble compiling from source when using dein, try these shell commands:
| 1 | cd ~/.cache/dein/repos/github.com/neoclide/coc.nvim |
| 2 | git clean -xfd |
| 3 | npm ci |
Using NeoBundle
Use release branch:
| 1 | NeoBundle 'neoclide/coc.nvim', {'branch': 'release'} |
Using Paq
Use the release branch.
| 1 | {"neoclide/coc.nvim", branch="release"}; |
Using pathogen.vim
| 1 | cd ~/.vim/bundle |
| 2 | git clone -b release https://github.com/neoclide/coc.nvim |
Using vim8's native package manager
Get the source code from the release branch:
vim8:
| 1 | mkdir -p ~/.vim/pack/coc/start |
| 2 | cd ~/.vim/pack/coc/start |
| 3 | git clone --branch release https://github.com/neoclide/coc.nvim.git --depth=1 |
| 4 | vim -c "helptags coc.nvim/doc/ | q" |
neovim:
| 1 | mkdir -p ~/.local/share/nvim/site/pack/coc/start |
| 2 | cd ~/.local/share/nvim/site/pack/coc/start |
| 3 | git clone --branch release https://github.com/neoclide/coc.nvim.git --depth=1 |
| 4 | nvim -c "helptags coc.nvim/doc/ | q" |
Check service state
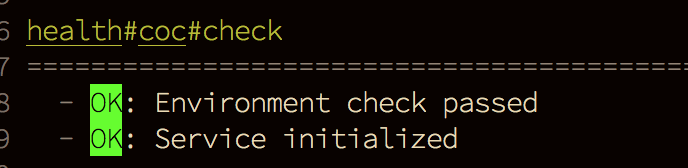
To check whether the coc.nvim service is running, use the :checkhealth command in neovim (not supported by vim). The output looks like:
Set the g:coc_node_path variable to specify the node executable used to start the coc.nvim service.
Another useful command is :CocInfo — use it after the service has started to get useful information about it.
Install extensions for programming languages you use daily
For example, for generic web development, consider :CocInstall coc-tsserver coc-json coc-html coc-css.
For Python 3: :CocInstall coc-pyright
For PHP: :CocInstall coc-phpls
and so on.
For more information, check out Using coc extensions.
Add some configuration
Run :CocConfig, which opens the main config file ~/.config/nvim/coc-settings.json (empty for a new installation). Add an empty JSON object ({}) and then add configurations for language servers not already covered by existing extensions (e.g. if you already installed coc-pyright, you don't need to configure the pyls server).
For more information, check out Using the configuration file.
Install watchman for file watching
For features like workspace_didChangeWatchedFiles to work, you will need to install watchman by following the instructions at Watchman installation guide.
Watchman also works well when you have multiple (neo)vim instances started in the same directory. You can configure watchman to ignore some directories using a .watchmanconfig configuration file in your project root:
| 1 | { |
| 2 | "ignore_dirs": [ |
| 3 | "dist", |
| 4 | "node_modules" |
| 5 | ] |
| 6 | } |
Warning: Don't create a .watchmanconfig file in your home directory.
Note: An undocumented global configuration: put .watchman.json in your $HOME root. See Watchman configuration source
Note: watchman can use a lot of memory. Run watchman watch-del-all in your shell to free up some memory.